Paper Lanterns Sew Along Week Twenty-Five
We made it! We made it through the sew-along and we’ve made it through 7 months of Covid. I had no idea when I started this years sew-along that it would turn into what it has. The Paper Lanterns quilt aptly names ‘The Covid Quilt’ has been a highlight of 2020 for me and I’m sure for many of you as well. I want to take this opportunity to say Thankyou! for joining me for this sew along, for keeping me accountable and for sharing your progress with me.
I’ve been asked by many of you ‘whats next’? Well for those who have followed me for some time know that I do a sew-along every year. I’m not about to jump straight into the next one but we will release a new sew along in 2021 so be sure to keep following long on my social channels and if you don’t already be sure to sign up for my newsletter where we release upcoming events, products, promotions & sales. Go to the following link, scroll to the bottom of the page and in the bottom right hand corner there is a field called ‘Keep in Touch’ simply enter your email address there and you won’t miss a thing. Click HERE! to sign up to our newsletter.
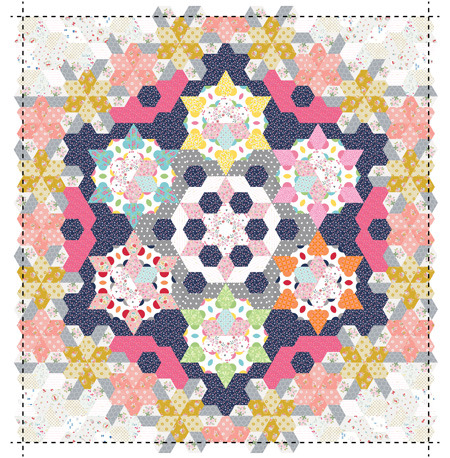
Now for the final instructions for the quilt. Finish sewing all of the sections together. Give the quilt top a good press and remove all of the papers. Press again. Now it’s time to trim the edges as shown in the diagram.
Trim the excess fabric off the edges of the quilt so it is now straight.
layer your quilt. You have a few options with this, including using spray baste (if machine quilting) or Pinning and tacking the layers (if you plan on hand-quilting).
Option 1: Spray baste
Lay the backing on the table with the wrong side facing up and tape it down. Spray with spray baste sparingly.
Lay the wadding on top and spray lightly.
With the right side up lay the top onto the wadding. Smooth out with your hand and press.
Option 2: Pinning or tacking
Lay the backing on the table with the wrong side facing up and tape it down.
Lay the wadding on top.
With the right side up lay the top onto the wadding.
Pin or thread baste all three layers together.
Note: these instructions are not required if you are having your quilt professionally quilted.
QUILTING:
Quilt in your preferred manner.
I have all of my quilts professionally quilted by Cathy Schibrowski of Swandale Quilting, telephone 0400 879 552.
Trim up the quilt top.
BINDING:
Binding is made from 2” wide strips. If you have made your quilt approximately 67″ x 70″ (the original size) then you’ll need 45cm (1/2yd) of fabric to bind your quilt. Join the strips end to end and press the seams open.
Fold the binding in half-length wise with wrong sides together and press.
Line up the raw edge of the binding with the edge of the quilt right sides together.
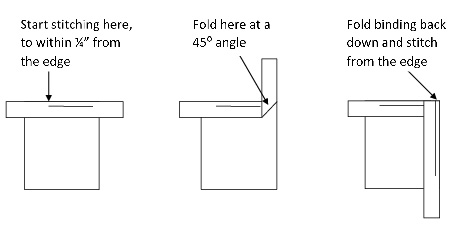
Start stitching part way along one side leaving about 6” of binding loose at the beginning. Mitre each of the corners as you go following the diagrams below.
When you get to within approx. 6” of the end remove from the machine.
Measure and join the binding pieces together. Continue to sew the remaining binding to the quilt.
Once you have finished, fold the binding over to the back and hand sew with a slip stitch.
Thank you again for joining me for the past 25 weeks, I have thoroughly enjoyed sewing along with you all. For those who have not yet finished their quilt top, please continue to post your progress shots and once you have finished the quilt I’d love to see it. Tag @suedaleydesigns on facebook & instagram or email us your quilt to sales@busyfingerspatchwork.com
Please keep safe, until next time!